Showing posts with label painting. Show all posts

9/25/10

Happy Birthday, Little Man!


I'm welcoming myself back into the world of craftiness today. And, what better way to warm up those muscles than with a birthday present. Or, at least the bag the present will be in. I've reused a shopping bag from Lands End Canvas (cute clothes) and made it something that my little friend will like. I almost squished the bag while cleaning up this morning. But it survived and inspired me to do this gift bag with acrylic paint. It's only painted on one side because I only have a couple of hours until the party and I was worried about it being dry. Little Man likes tractors, like another boy that I know, so I've gotten really good at drawing and painting tractors. I might have to try my hand at tractors in other media.

My return to Nifty Table also means that I will share with you the projects that I've done over the summer. Here is a short list of things to expect soon:

  • Twig wreath
  • Baby shower invite
  • Anniversary shower invite
  • Applique cardigan
  • Beaker plant
Well, it's time to head out for the birthday party! Talk to you soon.

    7/20/10

    Welcome to the Mt. Horeb art fair. Just one week after Art Fair on the Square, and you'd think that I was art-ed out. No way! Here were more artists with different works. I liked many of the things that I saw - photography, wooden trucks, jewelry, metalwork and more. I bought a few things for me and a few gifts. Here is one of my purchases for myself - a spoon ring. I know someone who has one and I've often admired it and coveted it. Now, I have one for my own! I put it on right away.
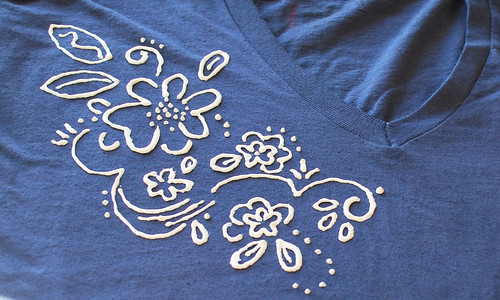
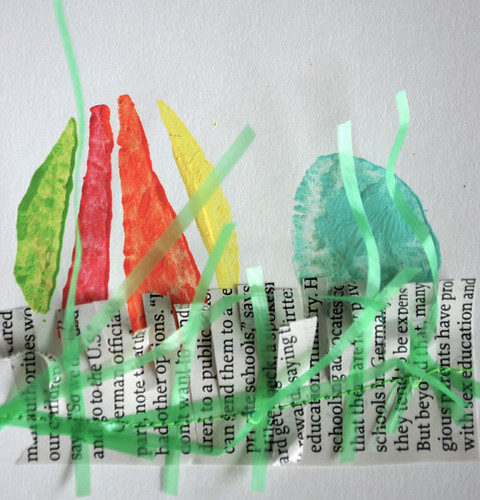
    I also purchased a work of art for my home. The booth was set up a little from the street, but the bright colors made it stand out. The artist, Gisela Magdalena Moyer, was so nice in describing the feelings that go in to her work. It was inspirational to see the wonderful work and hear how her art has helped her through dark times and still remain able to paint with vibrant colors. One of the first pieces to catch my eye was this piece. Mrs. Moyer describes the meaning and inspiration for the hand art on her website:
    These works are very meaningful to me. The hand is one of the oldest symbols for the artist in history. Early man dipped his hand into clay and printed the image on the walls of caves to make this statement: "I was here, I mattered, I had a creative spirit!"
    My hands are my tools because they complete what my soul conceives. The Butterfly is my symbol for spiritual lightness. Although this series is whimsical, many of my clients are touched by these works.


    She told me that she was inspired by someone telling her that if you touch a butterfly's wings it will die. This work means that you should let go of things. She explained the imagery in the work and what it meant to her. The bee is there for growth, because, she says, anyone who gardens knows that you can't have a garden without bees. The flower and leaves on the fingers are each different, as each of our finger prints are different. The oak leaf represents strength, because the oak leaf is the last to leave the tree. Finally, the flower at the bottom represents inner beauty.

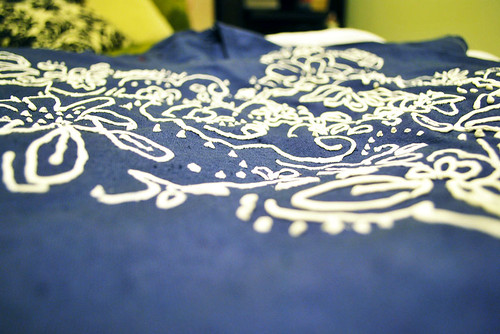
    I found the perfect place to hang my paper hand with butterfly - right where the sun first comes in, where I can see it every morning when I wake up in the morning. Go to her website and read her story and see more of her remarkable work. 

    So, even though it was hot, I had a very nice time in Mt. Horeb. I even got to meet one of the trolls!

    7/15/10

    Art Fair on the Square, day 2


    I got to be an artist as well at the Art Fair on the Square this year. For day two of Art Fair, I volunteered in the kids tent and staked out face painting as my area. Here are two of my customers showing off their artwork. It was so much fun to paint rainbows, balloons, baseballs, basketballs, fish, flowers, hearts, and dinosaurs. I also had two special requests, a track and a space monster. Above is the tractor. It is based off a John Deere, but I didn't have any green paint. Thanks to a certain little boy back in Texas, I got used to drawing tractors, specifically John Deere tractors with bailers. So, when this little boy's mom looked at me with a bit of worry when he asked for a tractor, I assured her that I could paint a tractor.

    Working in the kids tent kept me from spending more time looking at the art, but there are some more posts of the pretties that I got to see on Saturday. Unfortunately, I packed my bags and headed out of town shortly after all the fun of Art Fair ended. I'm almost home and back to real life. Keep an eye out for the rest of those artists that I liked!

    6/26/10

    Way back in Texas

    iPhoneTexas

    I've escaped the pull of the black hole! So, I'm circling back around to all of the things that I've wanted to share with you over the past few weeks. Above is a quick photo story of my trip to Texas. I took pictures on my iPhone of many of the things I did over the weekend. Some events aren't fully represented because, well, I was an active participant.

    I'm not going to give you a play by play of the photos, but I will tell you that the calf at the far left is named Buddy, that's my aunt and uncle in the mural next to Buddy and the pies in the picture are rhubarb and squash.

    This was a nice trip to Texas, covering many of my favorite things. I enjoyed being back down there and seeing family and friends. It definitely recharged my Texas batteries, and seeing these pictures has topped off that charge. I might even wear my cowboy boots to the picnic later today.

    Expect more posts over things that I've done in the past two weeks. Then, I guess I'll have to tackle new projects.

    3/31/10

    Joy

    I created this 5"x7" painting for one of my really good friends. I enjoyed giving it as much as I did painting it, and I hope that it brings her Joy.
    Joy

    The painting is done on canvas with plain old craft store acrylics. And, when I say old, I mean it. Some of those paints made the move with me almost three years ago, and they weren't new then! A couple of lessons from this project:

    1) When you buy new paints, write a date on the bottom so you know the old ones
    2) Don't use clumpy old paints to paint words
    3) Practice painting words before the next project


    3/30/10

    Photo Collage

    Back in December, I visited the Etsy Dallas Jingle Bash and purchased some awesome letterpress letter cards spelling out our last name.  I didn't really think about where I was going to put them, so when I got them home, I tried holding them up around our apartment.  They never seemed quite right anywhere, but ended up on the wall in the corner behind our TV. They were looking really strange to me back there and it finally got on my nerves enough that I decided to a photo collage around the letters.


    I'm all about cheapness, and thrifting at Goodwill led me to some fantastic frames for only a buck or two.


    IMG_1455


    After clorox-wiping all of the Goodwill frames, I started arranging the frames around the paper templates I'd made of the letters already on the wall (pardon the puppy, she got curious).


    IMG_1453


    Then, I made paper templates of all the frames and hung those on the wall with the letters to make sure it looked okay from across the room.


    IMG_1454


    I don't have any pictures of the actual painting, but I hauled all the goodwill frames out to the top deck of the parking garage at my apartment complex (oh, how I wish I had a house with a yard) and spray painted them all black while my neighbors looked at me like I was crazy.


    IMG_1473


    Ta-Da!


    IMG_1476

    3/28/10

    Books

    Craft acrylic paints are my favorite for a quick painting. You can do the whole painting in one sitting. Once you're finished with one color, then you move on to another color, working sort of like a paint by number so that when you get to colors that touch, one of them is dry.


    This is a two-painting set that I did for a silent auction. The benefits from the auction go to Second Harvest food bank. I call this one vol. II because there are two paintings and because this is my second time to paint books. I have a similar painting hanging in my office at work.


    Books-vol2


    Maybe for the next in my series, it will be three paintings! Tell me what you think.

    3/23/10

    Puff painting

    Do you remember puff painting t-shirts as a kid? That was the last time I did it, which was probably in the mid '90s. So, I don't know what came over me to try it again.


    This started as one of the dyed t-shirts I made last week. Then, I just grabbed a bottle of white puff paint from Hobby Lobby and started doodling on one shoulder. My original plan was for a motif along one shoulder, but I was having so much fun that I covered the whole shirt. I even wore it to work one day (I don't have to dress fancy). It definitely was fun to look down and see the texture.


    puffpaint2


    Puffpaint1


    puffpaint4
    puffpaint3puffpaint5
    I think I'm good for puff paint right now, but I want to try again with larger blocks of paint in more colors.

    3/15/10

    Easter cards

    You'll see a lot of different greeting and notecards here at the Table. I've been into card making for a couple of years, maybe more than that! What started with leftover scrapbooking supplies (when that was my thing), has become a way to try new techniques. Friends and family have come to expect handmade cards on their birthdays and any holiday worth sending a card (no cards for administrative assistants day!). I combined three different techniques on these cards: potato stamps, sewing on paper, and collage. 


    eastergg11 1) Cut eggs out of potatoes. It's surprising, but I didn't cut myself! After cutting the (russet) potatoes in half, I took my paring knife and ran it about a quarter an inch from the cut edge, at about a quarter of an inch in. Then, I start to carve the egg shape. I tried to add different designs. Straight lines were easiest, polka dots didn't turn out well at all
    easteregg10 2) Grab some acrylic paints in assorted spring colors and start painting the different sections of the egg. I reused the best of the 'eggs' with different color combinations. Here, remember to wipe off the paint, including the crevices or you get green when you expect yellow after a couple of stamp
    easteregg9 3) Lay out the cards and start stamping. I tried different combinations of one, two and three eggs. I also tried horizontal and vertical layouts. My favorite turned out to be two eggs with minimal overlap on a vertical card
    easteregg8 4) To keep the eggs from making a mess on my table, I used an egg carton. Yes Mom, I know I forgot to put down a drop cloth over my nice table. I promise I didn't make a mess and I won't do it again
    easteregg7 5) Cut strips of text from a magazine. Time Magazine worked well because it has large blocks of text and the paper is pretty thin. Then, cut a fringe along one edge. I used a glue stick to tack down the newspaper grass
    easteregg6 6) This part was messy. Open up a bag of the green plastic grass for Easter baskets. Cut the pieces in half because you don't need the whole length
    easteregg5 7) Lay the card on the sewing machine and spread some of the grass over the other grass. Just grab a handful and lay it on top; not all of it will get caught in the stitch. I probably wouldn't recommend this method if you're a perfectionist, but it was interesting to see what stuck. If there are holes in the green grass, just grab another handful and run a second stitch
    easteregg4 8) Trim the grass. This was definitely the biggest mess. Thank goodness for my dustbuster! I tried to trim the green grass so that it didn't stick off the card or cover too much of the eggs
    9) Fan out the newspaper grass, pop in an envelope and drop it in the mail. If you want to skip all but this last step, you can get a handmade, unique potato egg card at my etsy shop


    Eastereggs1

    3/4/10

    Nifty Table

    Welcome to my new project! My goal is to help spark your creativity by presenting projects that I've completed (along with steps and photos), reviews of craft books, resources, and ideaboards based on what I like at the present. You'll probably also see quite a few references to Etsy, which I love.


    During the day, I am a project manager at a software company. But, before this, I had a background in journalism and dabbled in graphic design. I miss the creative outlet that my previous job provided, so this is my attempt to make up for the loss.


    Here are some of my projects:

    My interests are scattered widely through the craft world: painting, computer graphic desing, sewing photography, but especially paper crafts. I really like making cards or anything that can be done with pages ripped out of magazines. Oh, and as you can tell, I also like birds.

    My mom and sister are also quite crafty. At Home (with the big H), we do most of our crafting around the dining room table. Thus the name of the blog. I expect you'll be hearing from the two of them along the way.

    Thanks for joining me!